

Direct answer: To install a script tag with Google Tag Manager, sign in to tagmanager.google.com, open your container, create a new tag of type Custom HTML, paste your full <script> snippet into the HTML box, set the trigger to All Pages, click Save, use Preview to confirm it fires, then click Submit / Publish. As long as the GTM container itself is already installed in your site's <head>, the script goes live on every page within seconds - no developer and no code changes to your site required.
Key takeaways
- Google Tag Manager (GTM) is a free tool that lets you add, edit, and remove third-party scripts on your website without touching your site's code each time.
- You install the GTM container once. After that, every new script - analytics, ad pixels, chat widgets, the Abmatic AI tag - is added through the GTM dashboard.
- Most script tags are added as a Custom HTML tag firing on the All Pages trigger.
- Always use Preview mode before publishing, then verify the script actually loads with your browser's developer tools or the Tag Assistant.
- For scripts that need to run as early as possible (visitor identification, personalization, A/B testing), GTM is a good fit but a direct
<head>install is marginally faster - we cover the trade-off below.
What is a script tag, and why use Google Tag Manager?
A script tag is a small piece of code - usually one line - that loads a third-party tool onto your website. It looks like this:
<script async src="https://example.com/your-script.js"></script>When a browser loads your page and reads that line, it fetches the file and runs it. That is how analytics platforms, advertising pixels, live-chat widgets, heatmap tools, and visitor-identification platforms all hook into your site.
You have two ways to add one. You can paste it directly into your site's HTML <head> - which means a code change and usually a developer - or you can use a tag manager. Google Tag Manager (GTM) is the most widely used, and it is free. You install GTM once, and from then on you add, edit, or remove every script from a dashboard without ever redeploying your site. That is the whole point: marketing and growth teams get to manage their own tags without filing an engineering ticket for each one.
Before you start: do you already have GTM installed?
There are two distinct steps people often confuse:
- Installing the GTM container - a one-time job where two snippets (one for
<head>, one for<body>) are added to your site. This is the only time you touch your website's code. - Adding individual script tags - everything after that happens inside GTM and requires no site changes.
If GTM is already on your site, skip to Step 2. If you are not sure, open your live site, right-click, choose View Page Source, and search (Ctrl/Cmd + F) for googletagmanager.com or GTM-. If you find it, the container is installed.
Step 1: Create and install the GTM container (one time only)
Skip this entire step if GTM is already on your site.
- Go to tagmanager.google.com and sign in with a Google account.
- Click Create Account. Enter your company name and country, then enter your website's domain as the Container name and choose Web as the target platform.
- Accept the terms. GTM shows you two code snippets and a container ID that looks like
GTM-XXXXXXX. - Add the first snippet as high as possible inside the
<head>of every page, and the second snippet immediately after the opening<body>tag. Most website builders (WordPress, Webflow, Shopify, Squarespace) have a dedicated "header/footer code" or "custom code" field for exactly this - or a free GTM plugin. - Publish or save your site, then return to GTM. You are now ready to add tags without touching code again.
For the canonical version of this one-time setup, see Google's own Install Google Tag Manager guide.
Step 2: Create a new Custom HTML tag
- In GTM, make sure you are in the correct container (top of the screen), then click Tags in the left menu.
- Click the New button.
- Give the tag a clear name at the top - for example, "Analytics pixel" or "Abmatic AI tag". Good names save you hours later when you have a dozen tags.
- Click the Tag Configuration box and choose Custom HTML from the list.
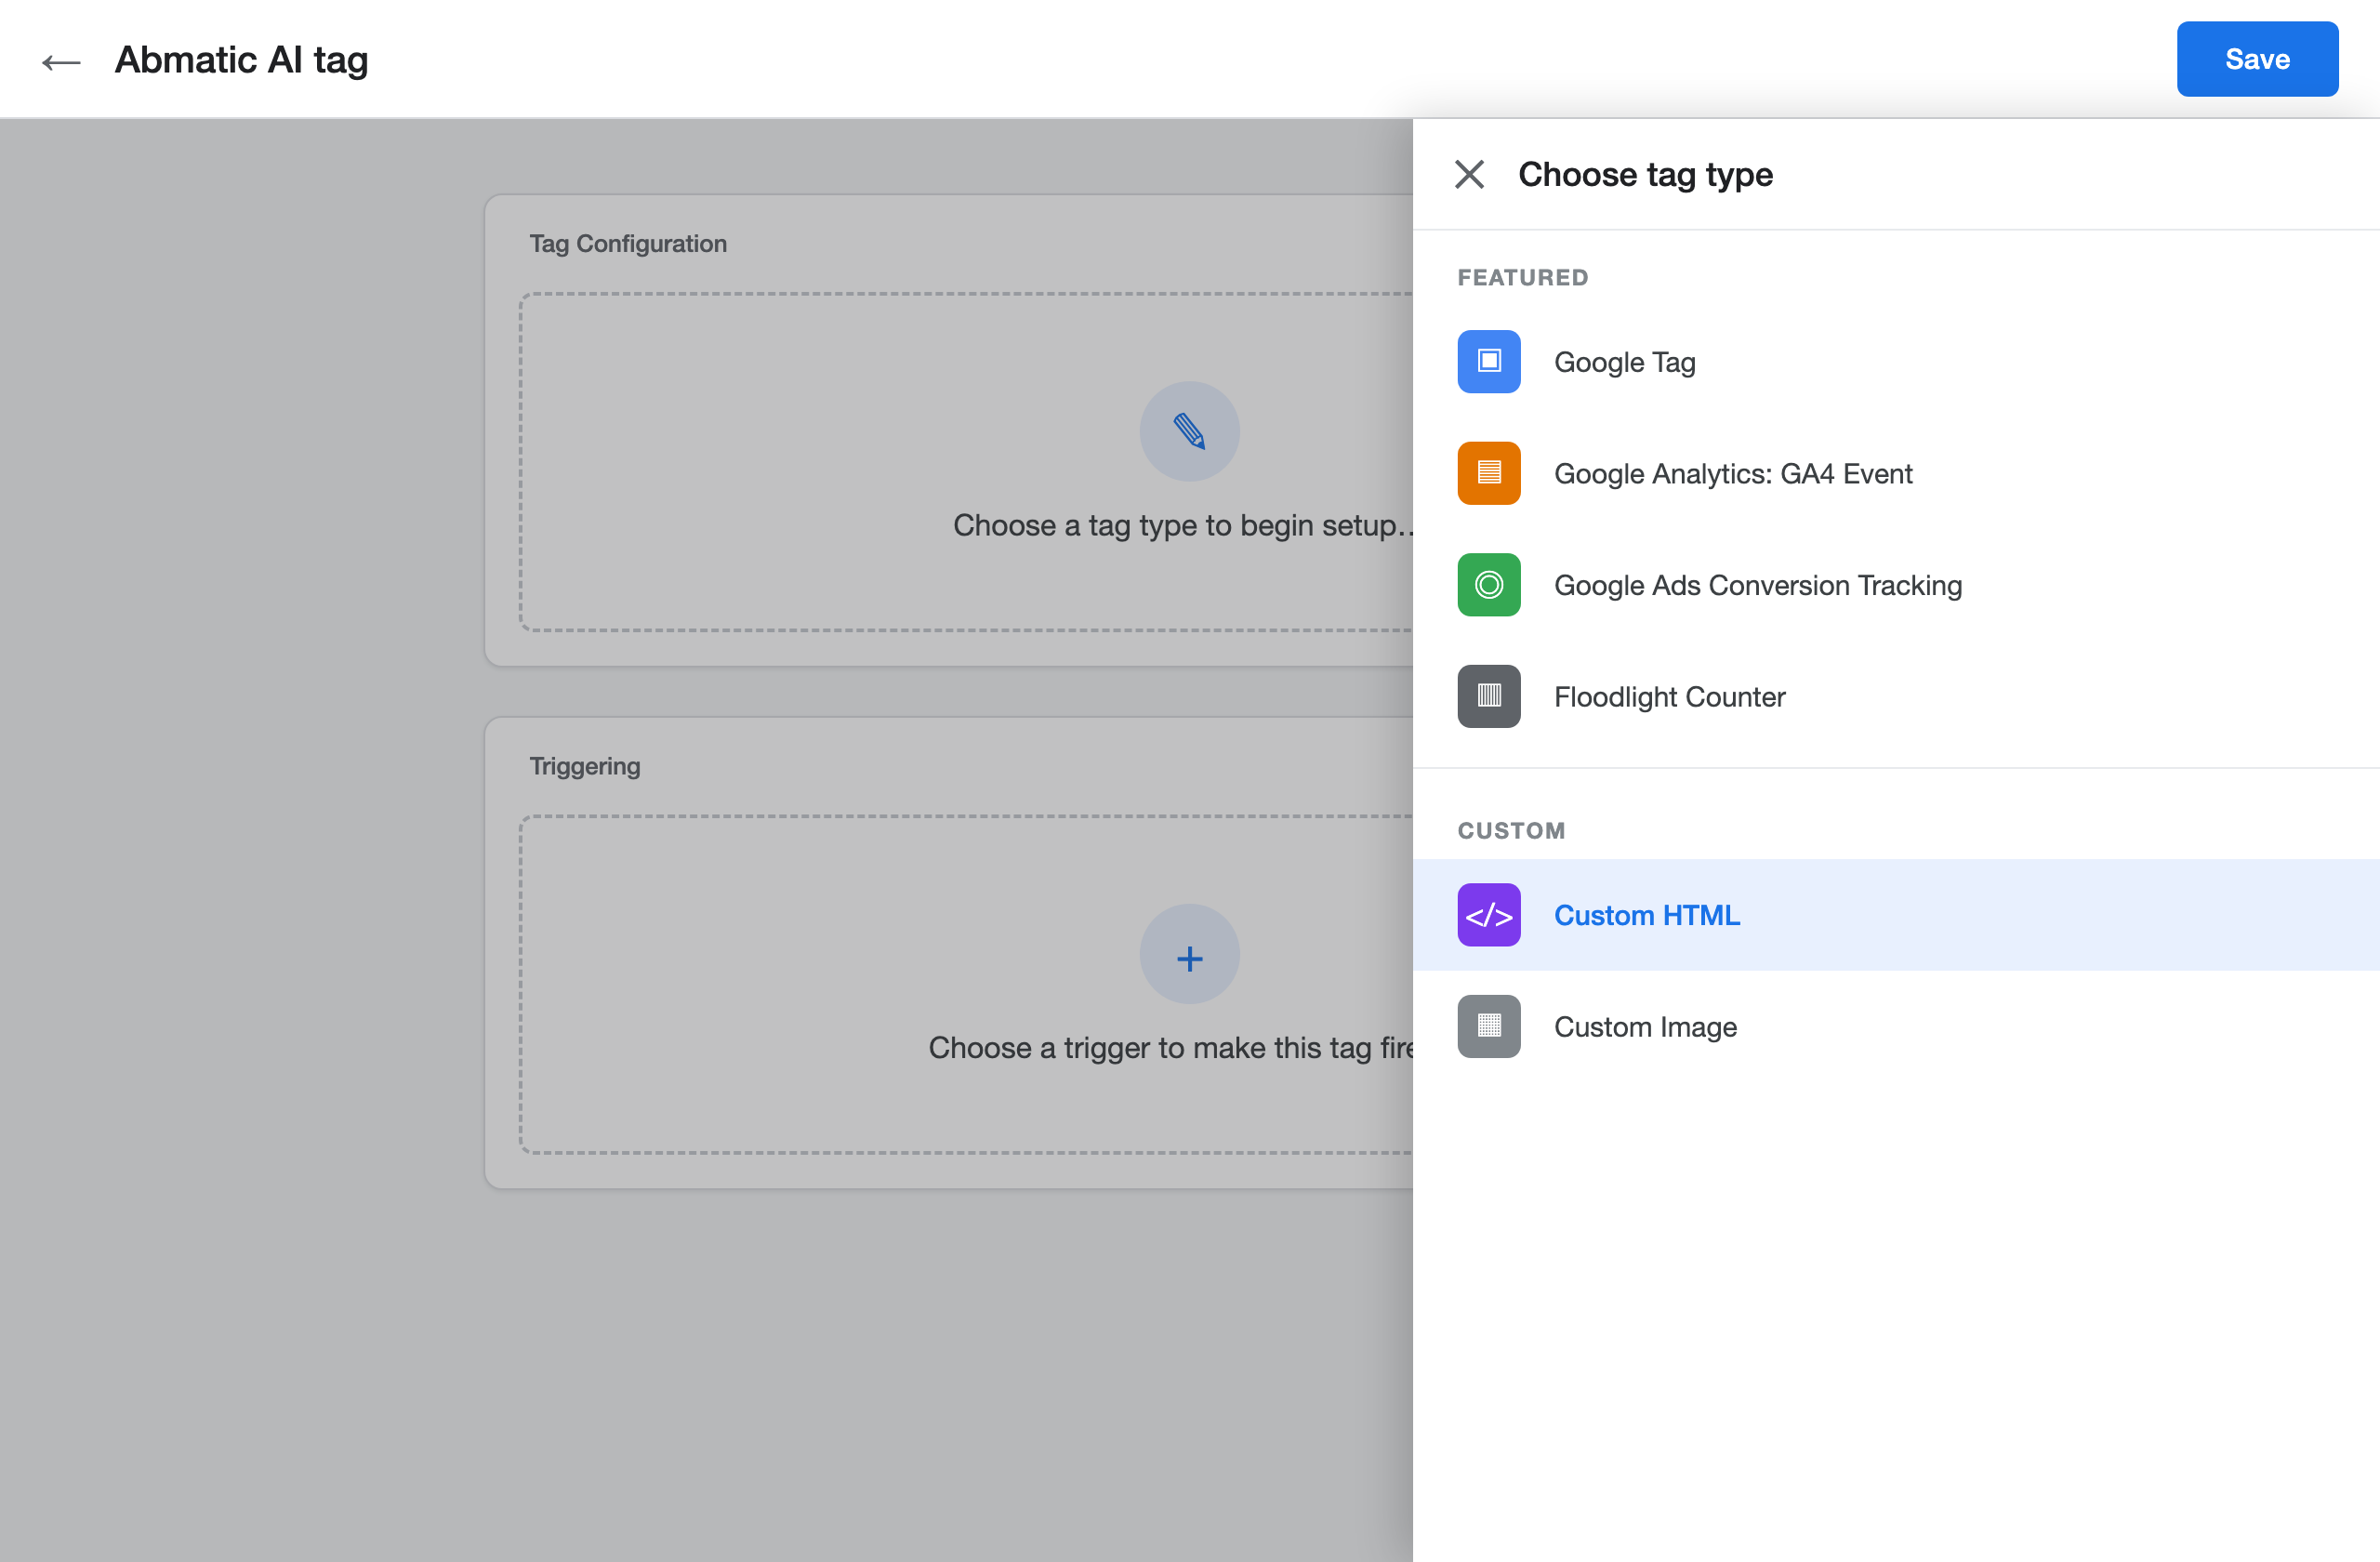
Step 3: Paste your script tag
- In the HTML field, paste your complete snippet, including the opening and closing
<script>tags. For example:<script async src="https://example.com/your-script.js"></script> - Paste the snippet exactly as your vendor provided it. Do not remove the
<script>wrapper, and do not edit the URL or any IDs inside it. - Leave the advanced settings at their defaults unless your vendor's documentation says otherwise. (One useful option: Tag firing options > Once per page, which prevents a tag from loading twice on single-page apps.)
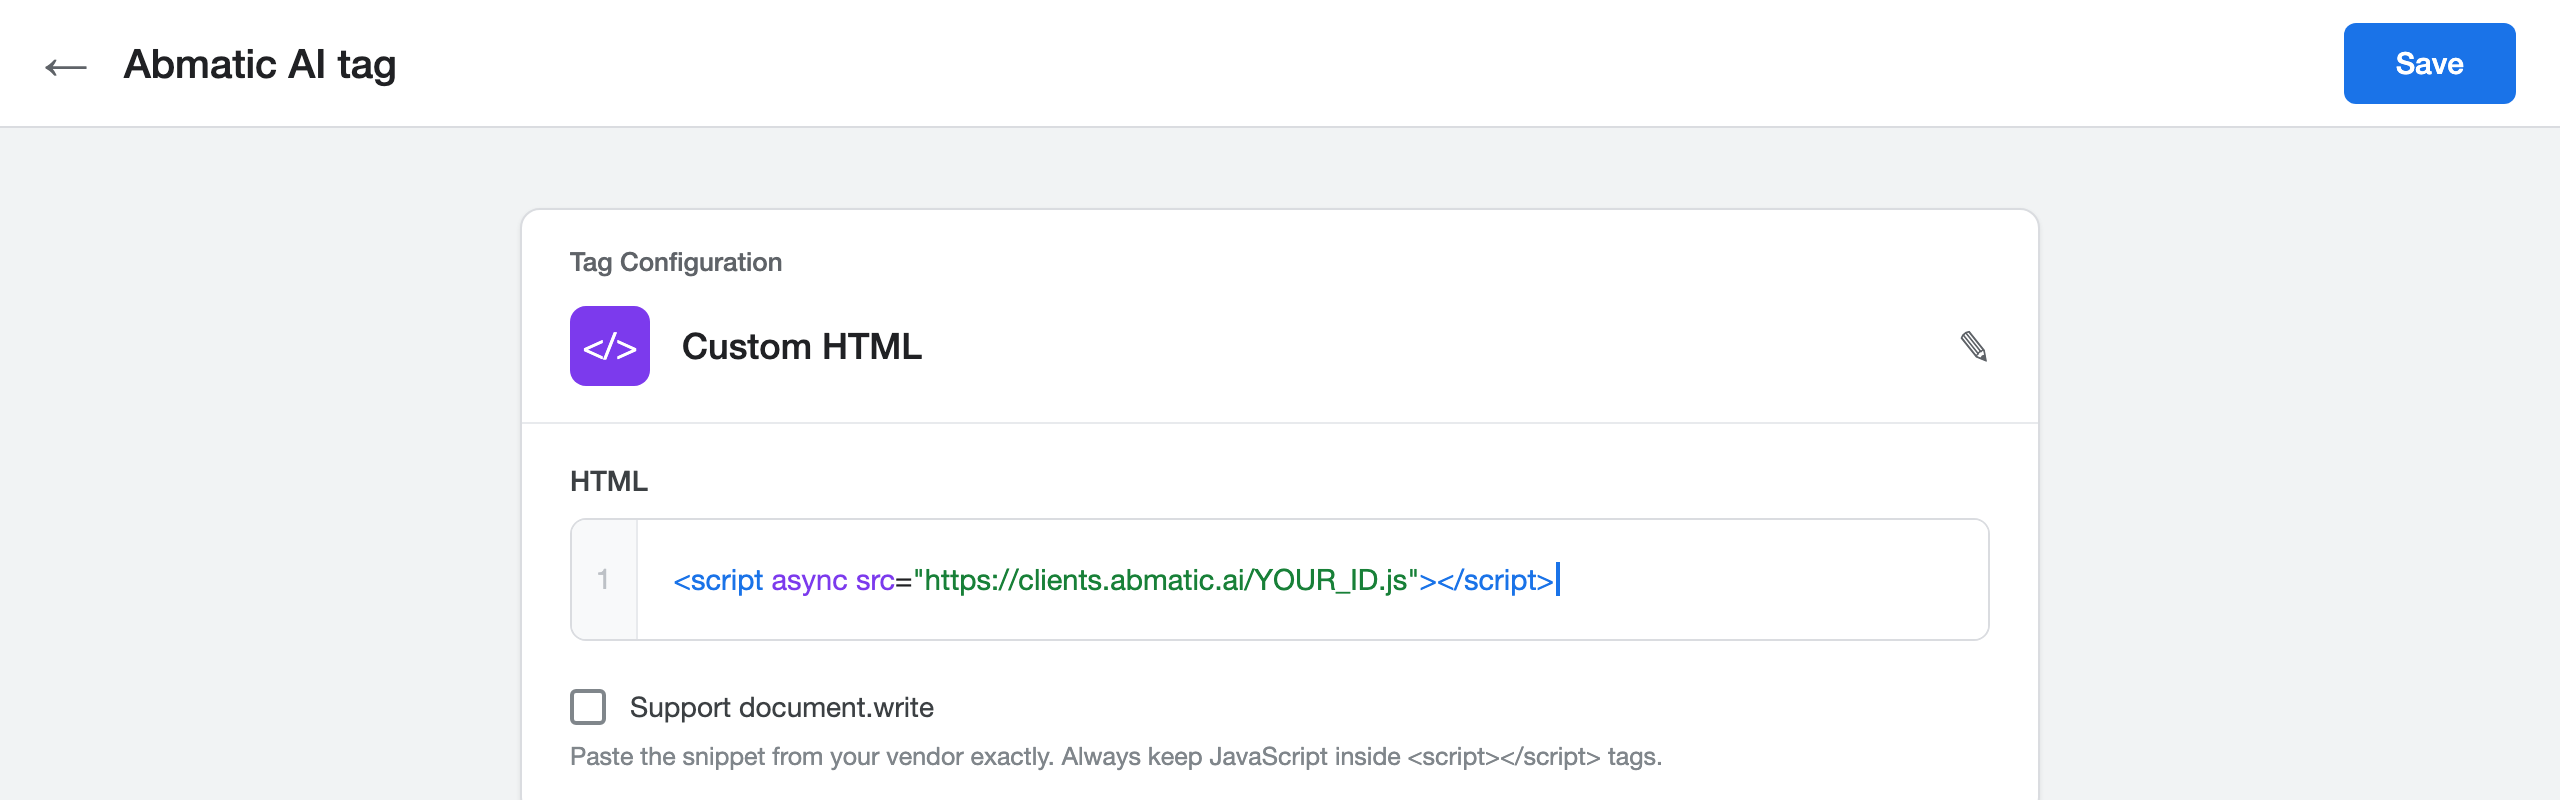
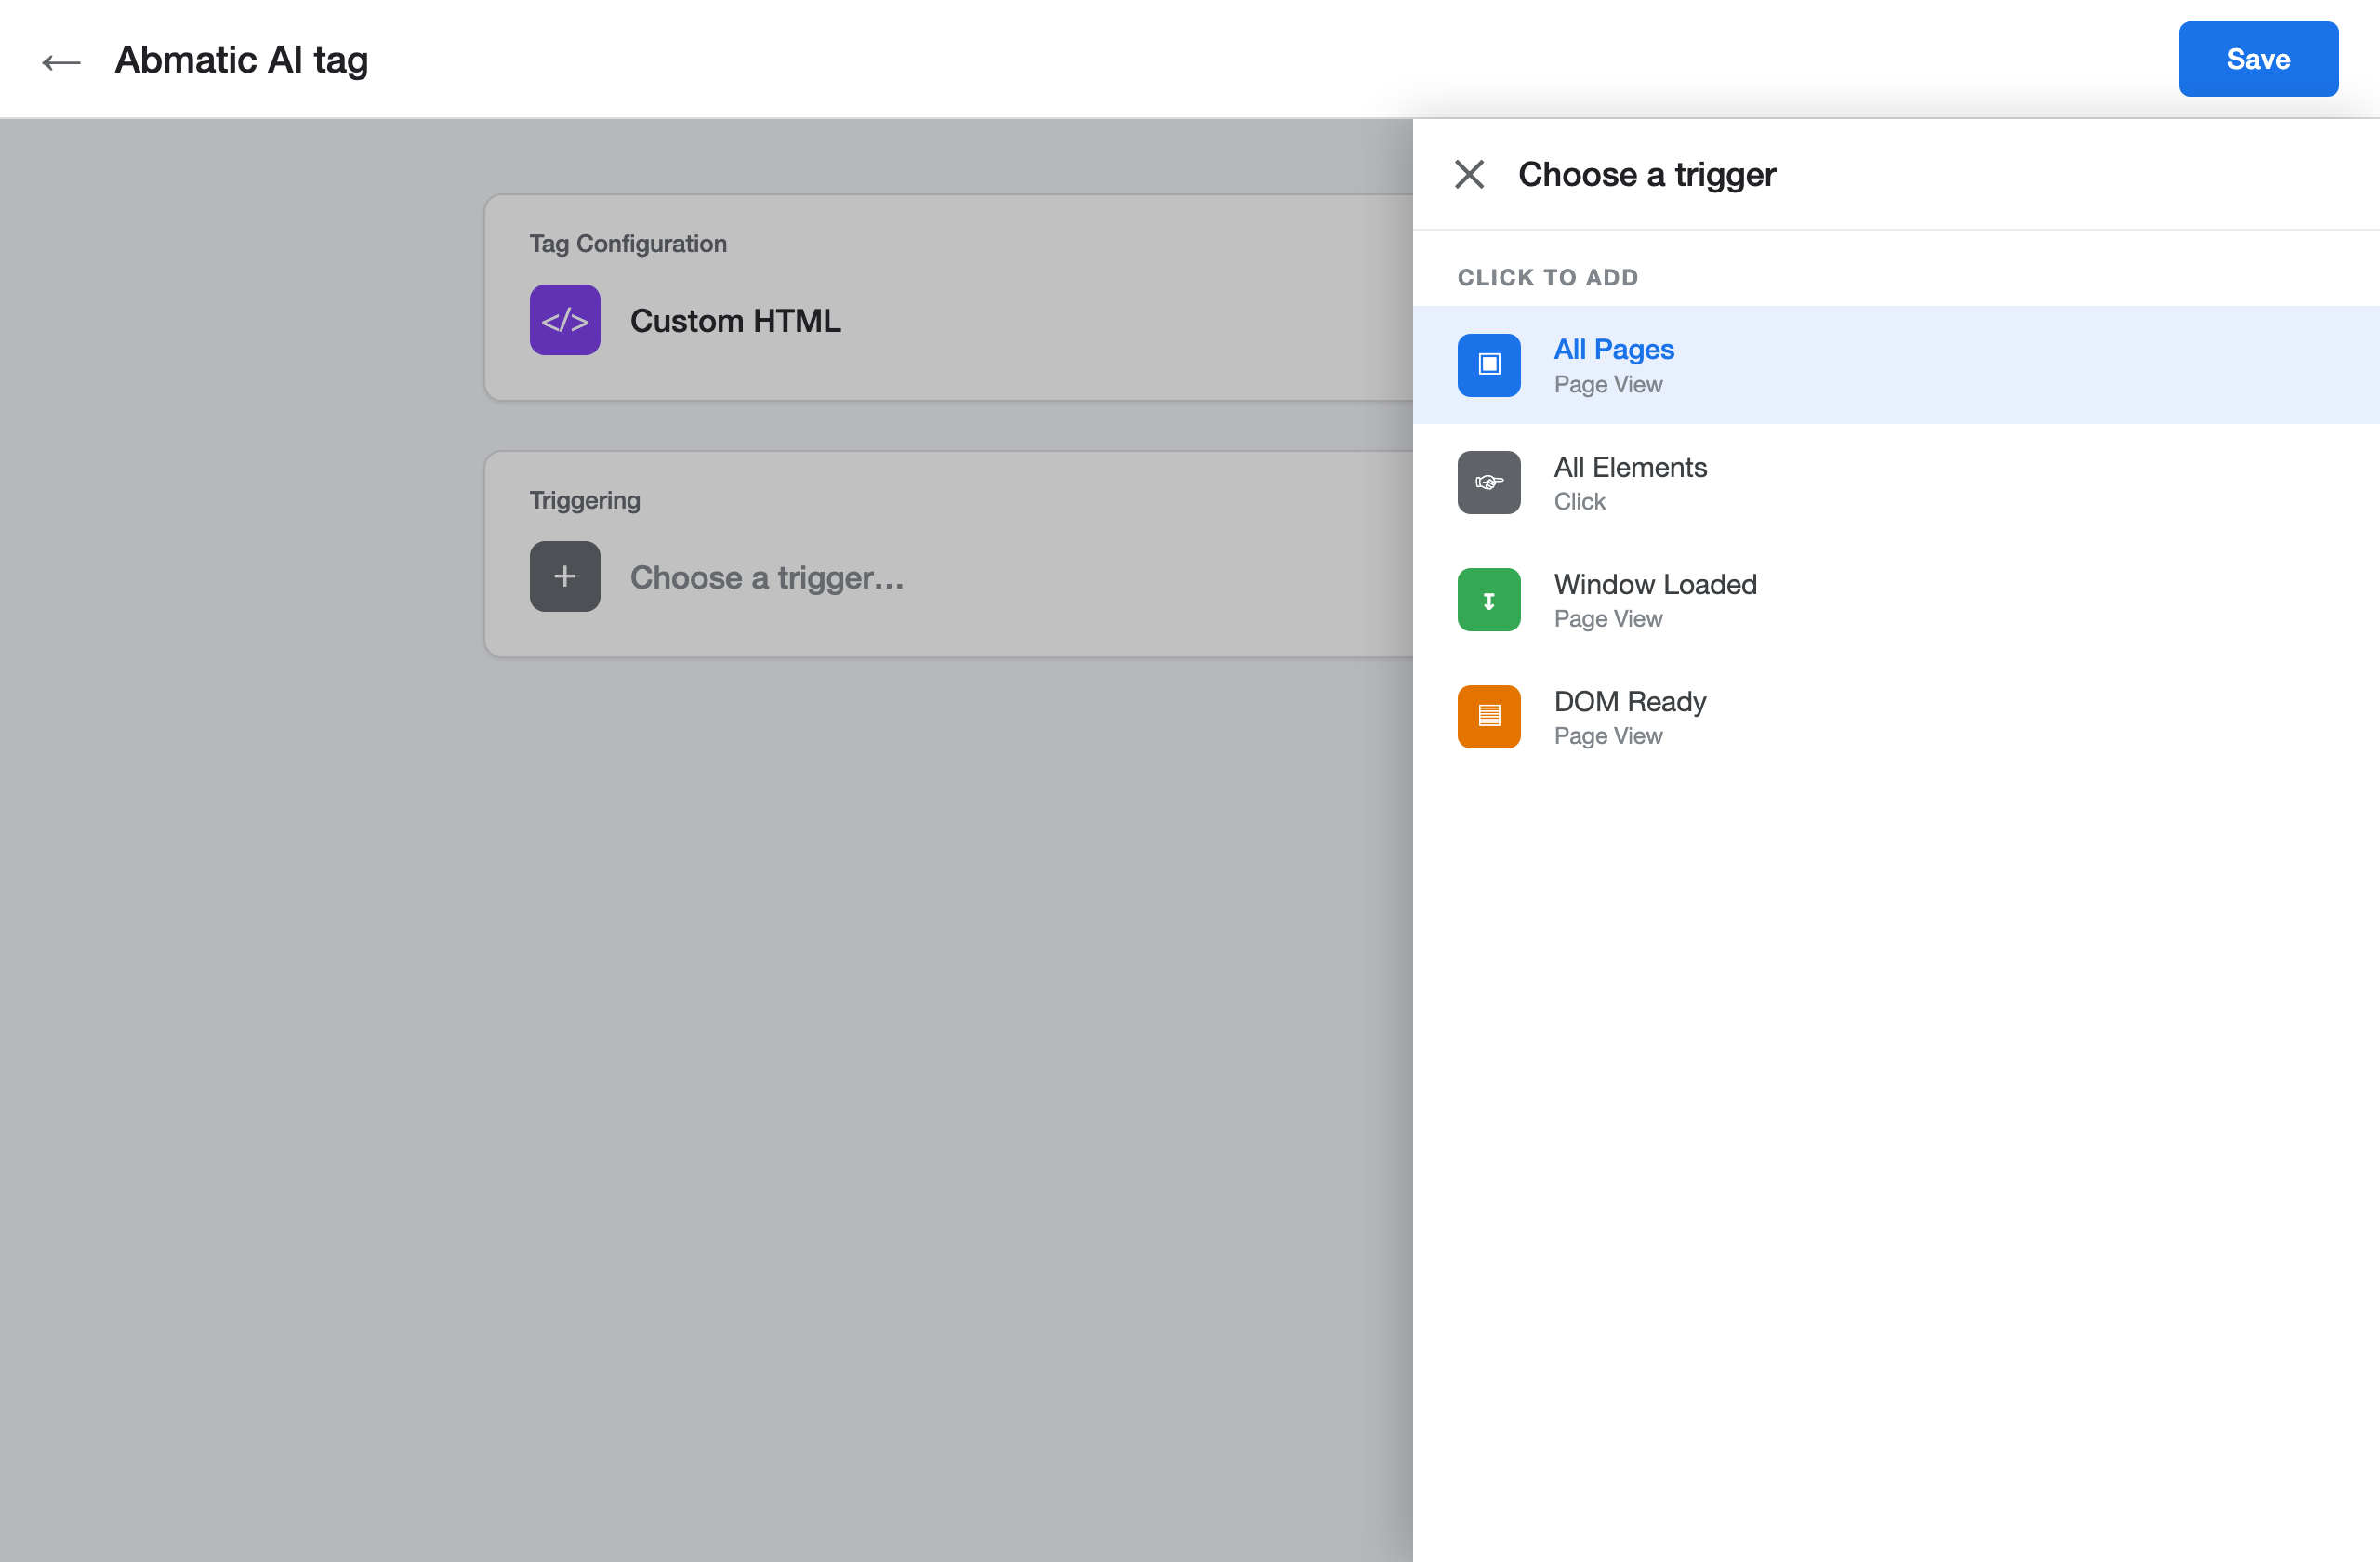
<script>…</script> snippet into the HTML field of the Custom HTML tag. Per Google's documentation, always keep JavaScript inside <script></script> tags.Step 4: Set the trigger to All Pages
A trigger tells GTM when to fire the tag. Most script tags - analytics, pixels, visitor identification, personalization - should run everywhere.
- Click the Triggering box below your tag configuration.
- Choose All Pages (a built-in trigger of type Page View).
- If you only want the script on specific pages - say, a pricing page or a thank-you page - create a custom trigger instead and define the condition (for example, Page Path contains /pricing).
- Click Save in the top-right corner.
Skip the manual work
Abmatic AI runs targets, sequences, ads, meetings, and attribution autonomously. One platform replaces 9 tools.
See the demo →Step 5: Preview before you publish
Never publish blind. GTM's Preview mode lets you confirm the tag fires correctly on the live site without affecting real visitors.
- Click Preview in the top-right of GTM.
- Enter your website URL when prompted. Tag Assistant opens your site in a new tab connected to a debug panel.
- In the debug panel, load a page and confirm your new tag appears under Tags Fired. If it shows under Tags Not Fired, your trigger condition did not match - revisit Step 4.
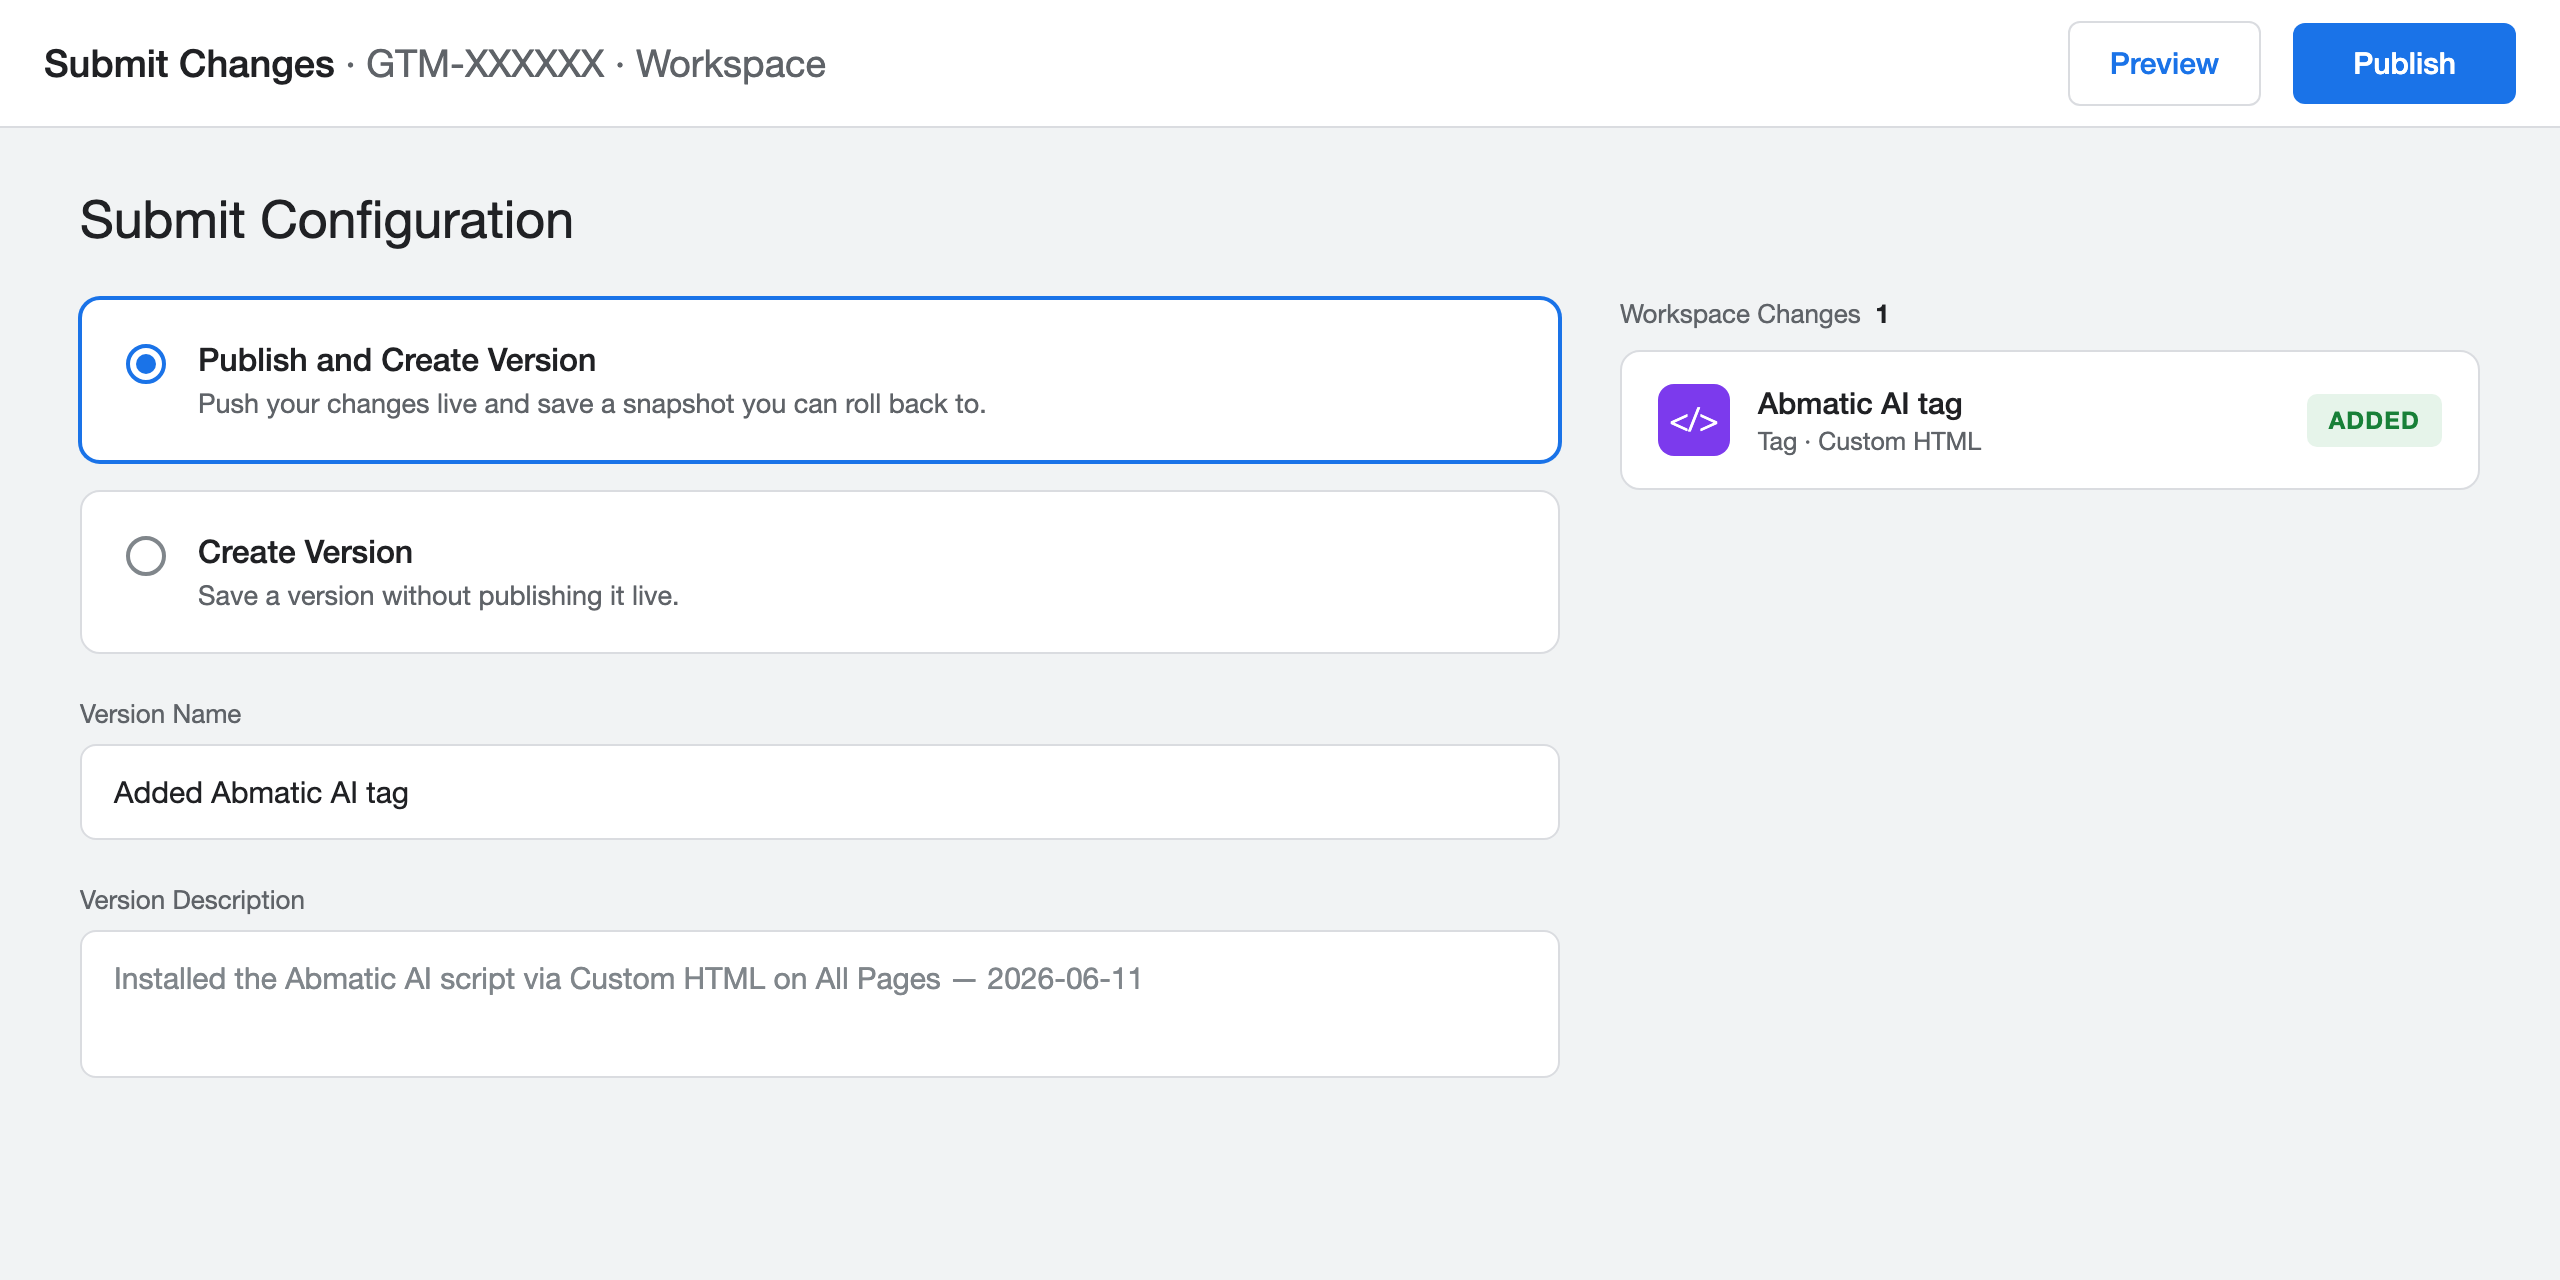
Step 6: Publish
- Back in GTM, click Submit in the top-right.
- Add a short version name and description (for example, "Added Abmatic AI tag - 2026-06-11"). This creates a version history you can roll back to.
- Click Publish. Your script is now live on every page that matches the trigger.
Step 7: Verify the script is actually loading
Publishing in GTM is not the same as confirming the script works. Do one final check:
- Open your live website in a normal browser tab.
- Right-click anywhere and choose Inspect to open developer tools.
- Go to the Network tab and refresh the page. In the filter box, type part of your script's filename or domain (for example, the vendor's domain). You should see the file load with a status of 200.
- Alternatively, install the free Tag Assistant Chrome extension and confirm the tag is detected.
How to install the Abmatic AI script tag with Google Tag Manager
If you are an Abmatic AI customer (or evaluating us), here is the exact flow. It is the same Custom HTML process above, using the snippet from your account.
- Copy your snippet. In the Abmatic AI app, open Installation. You will see a one-line JavaScript tag unique to your account. It looks like this (your ID will be different):
<script async src="https://clients.abmatic.ai/YOUR_ID.js"></script> - Create the tag in GTM. Follow Steps 2-4 above: new tag → Custom HTML → paste the snippet → trigger All Pages. Name it "Abmatic AI tag" so it is easy to find later.
- Fire it on every page you want to personalize. Abmatic AI identifies visitors and personalizes pages, so it should run on all public pages - the All Pages trigger is correct for almost everyone. The in-app guidance to "embed the code as high as possible in the
<head>" is automatically handled by GTM, which loads tags early in the page lifecycle. - Preview, then Publish (Steps 5-6).
- Confirm it went live. Open your site so it registers a visit, then return to the Abmatic AI app. The Status indicator on the Installation screen turns to Active once we detect the first visitor on your site, and you will see a "Last visitor" timestamp. If it still says inactive after a few minutes, re-check your GTM trigger and that the container is published.
That's it - the tag is installed and Abmatic AI starts identifying and personalizing for your visitors. You can always reach out to us to confirm the tag is detected on your site.
GTM vs. a direct <head> install - which should you use?
Both work. Use whichever you can ship fastest:
- Use GTM if your team already manages tags there, or you cannot easily edit your site's code. It is the lowest-friction path for most marketing teams.
- Use a direct
<head>install if you want the script to load a few milliseconds earlier - which can matter for personalization and visitor identification, where firing before the first paint reduces any flicker. If your developer can drop the one-liner straight into the site template, that is the marginally faster option.
For the vast majority of sites the difference is imperceptible, and GTM is the more maintainable choice.
Common mistakes and how to fix them
- The GTM container itself isn't installed. Adding a tag in GTM does nothing if the container snippet isn't on your site. Verify with View Page Source (look for
GTM-) before anything else. - You forgot to publish. Saving a tag is not the same as publishing the container. Changes only go live after you click Submit → Publish.
- The trigger is too narrow. If the tag shows under "Tags Not Fired" in Preview, your trigger condition didn't match the page. For site-wide scripts, use All Pages.
- The snippet was edited. Removing the
<script>wrapper or changing an ID breaks the tag. Paste exactly what the vendor gives you. - Consent and privacy. If you use a consent management platform, make sure tags that require consent are gated appropriately - GTM's built-in Consent Mode settings or a consent trigger handle this.
- Caching. If you don't see the change live, clear your CDN/page cache and hard-refresh (Ctrl/Cmd + Shift + R).
FAQ
Do I need a developer to install a script tag with Google Tag Manager?
Only once - to install the GTM container snippet itself. After that, you add, edit, and remove any number of script tags from the GTM dashboard with no further code changes and no developer involvement.
Where do I paste the script in GTM?
Create a new tag, choose the Custom HTML tag type, and paste the full <script>...</script> snippet into the HTML field. Then set a trigger (usually All Pages) and publish.
What trigger should I use for a tracking or personalization script?
Use the built-in All Pages trigger so the script runs everywhere. Use a custom trigger only when you deliberately want the script on specific pages.
How do I know the script is working after publishing?
Use GTM's Preview mode to confirm the tag fires, then check your browser's developer tools Network tab for the script file loading with a 200 status. The Tag Assistant extension is an easy alternative.
Is loading a script through GTM slower than putting it in the <head>?
Marginally. GTM loads asynchronously and fires tags very early, so for most scripts the difference is imperceptible. For latency-sensitive tools like visitor identification and personalization, a direct <head> install can load a few milliseconds sooner, but GTM is perfectly suitable and far easier to maintain.
Can I install the Abmatic AI tag through GTM?
Yes. Copy the one-line snippet from the Installation screen in your Abmatic AI account, add it as a Custom HTML tag firing on All Pages, and publish. The Installation status turns Active once we detect your first visitor.
Related reading
- How to add a script tag to your WordPress header using a plugin
- How to de-anonymize website traffic
- What is a reverse IP lookup?
- First-party intent data explained
Install once, identify and personalize from day one
The reason most teams install a script tag at all is to do something with the traffic - measure it, identify it, or personalize for it. That is exactly what the Abmatic AI tag unlocks. Once it is live via Google Tag Manager, Abmatic AI deanonymizes the companies and people visiting your site, segments them by firmographic and behavioral signals, and personalizes web experiences, outbound, and chat for each one - all from a single platform, with no extra tags to wire up.
So the GTM install you just finished is the only setup step between you and a working account-based revenue engine. Book an Abmatic AI demo to see what your anonymous traffic is actually worth.